Quilt Along with Leah Day - Week 13
This weeks we're finishing up our wholecloth quilt. The task was to soak the quilt, block it and then trim & bind.
First, I was thinking of skipping the soaking and boxing step. Personally being a novice quilter I was happy with my wholecloth quilt as is. So, thought why not just trim and bind.
I had sparingly used homemade starch and the disappearing ink pen. So, didn't feel that I wanted to do these steps and left a message at Leah's blog for her input. Since, I didn't get a feedback and didn't want to be rebel and followed those two steps too :-).
I used the same fabric for my binding. I usually cut my binding strips at 2.5inches and did the same for this project too. Again, the fabric I used was "Pearl Pink Kona Solid".
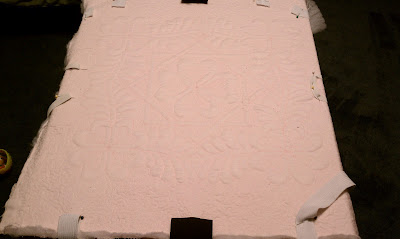
Here is a picture of my blocking the quilt:
Here is the picture of the quilt after I trimmed it and machine stitched the binding from the back:
I used Susan Brown's Binding Tool for joining the ends of the binding. There is also a tutorial on the same page "How to use the Binding Tool". The binding always lays perfectly flat with this tool :-).
I choose the following decorative stitch for the machine binding.
This morning I ran out of my bobbin and I don't think I going to able to wind my bobbin with the baby being around. So, here it is as is:
The sequence for decorative stitch is, heart, lotus flower & then butterfly. This pattern keeps repeating.
Finally got it done :-).
Leah I have couple question for you:
1. I know that we had used starch and need to get that out by soaking. Is there any other reason why we need to soak our quilt if its going to be a wall-hanging?
2. With all the stippling tutorials, will you be writing a book on Stippling FMQ? I'm just curious :-).
Leah thanks again for the wonderful tutorials. I just ordered some quilting supplies from your Day Style Designs online shop to support the Free Motion Quilting Project.
First, I was thinking of skipping the soaking and boxing step. Personally being a novice quilter I was happy with my wholecloth quilt as is. So, thought why not just trim and bind.
I had sparingly used homemade starch and the disappearing ink pen. So, didn't feel that I wanted to do these steps and left a message at Leah's blog for her input. Since, I didn't get a feedback and didn't want to be rebel and followed those two steps too :-).
I used the same fabric for my binding. I usually cut my binding strips at 2.5inches and did the same for this project too. Again, the fabric I used was "Pearl Pink Kona Solid".
Here is a picture of my blocking the quilt:
 |
| Blocking the Wholecloth Quilt |
Here is the picture of the quilt after I trimmed it and machine stitched the binding from the back:
 |
| Binding - before joining the ends |
 |
| Binding- perfectly seamed binding |
I choose the following decorative stitch for the machine binding.
This morning I ran out of my bobbin and I don't think I going to able to wind my bobbin with the baby being around. So, here it is as is:
 |
| Wholecloth Quilt Binding |
 | |
| Customized decorative stitch from my new Singer Machine |
 | |
| Closeup on the decorative stitch on the binding |
Leah I have couple question for you:
1. I know that we had used starch and need to get that out by soaking. Is there any other reason why we need to soak our quilt if its going to be a wall-hanging?
2. With all the stippling tutorials, will you be writing a book on Stippling FMQ? I'm just curious :-).
Leah thanks again for the wonderful tutorials. I just ordered some quilting supplies from your Day Style Designs online shop to support the Free Motion Quilting Project.


I'm sorry about missing your question last week, Malini! No, it's not a 100% requirement to soak and block your quilt. It's a good technique to learn, and something you'll need to know how to do if you want to make quilts that hang on the wall straight and perfectly.
ReplyDeleteCheers,
Leah Day
No problem, I was just wondering if I said something wrong ;).
DeleteYour response sounds great! Thank you so much Leah :-).
The stitching on your binding is so pretty. Just curious, did you have trouble turning a corner with that stitch sequence?
ReplyDeleteNo, I was okay.But need some planning. I usually stop right at the mitre and then turn.Sometimes I goof up and stitch a little bit over to the corner and then carefully turn it ;).
DeleteIf I was making this quilt for someone else I would be more careful while pivoting.General rule of tumb, stop exactly at the mitre and then pivot and start stitching on the other side.
I have to admit that I was very slow with this decorative stitch. When I tried to go little bit fast broke my needle ;), Oops!
What a lovely quilt! Congratulations Malini
ReplyDeleteThe quilt looks great...
ReplyDeleteI am presenting you with the Liebster Blog Award. Check out my blog for more info. Congratulation!
Karin at http://thequiltyarn.blogspot.com.au/2012/04/liebster-award.html
Thank you, Karin! It is so wonderful to hear that I won an award :-). Will have to blog about it soon.
DeleteCongratulations to you too!
Wow your quilt looks stunning and you have really fired up my interest in this project now.
ReplyDeleteI am just over here as one of the other Liebster winners for today. Have followed your blog in the spirit of this award.
Kind regards
Liz
xxxx
Thank you, Liz. I just checked out your quilts and they look amazing.
Delete