Posts

Showing posts from February, 2012

Quilt Along with Leah Day - week 7

Image
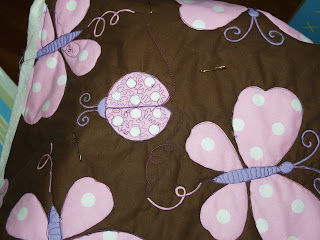
This week was really busy for me. I didn't get much time on the sewing machine. The baby was sick(had an allergic reaction and had rashes all over his face) and didn't get much sleep. I'm glad he is finally feeling better. But I did manage to get the quilted pieces to be bound together yesterday. I was also able to do the binding for my quilts/wall-hanging from previous week: Butterfly quilt with binding on Sawtooth Star Wall Hanging Here are some of the pictures as I'm making progress with putting the quilted pieces together: Showing the back binding holding the quilted pieces together Front binding  Since this was my first try it was hard to get a perfect 1/4 inch seam on the back binding. I noticed that I had stitched generous 1/4inch seam in the middle of the pieces. But I was able to hide it because I hand bound the pieces. Like Leah mentioned in her post, the hand binding finish does look beautiful.  Hand Binding on the back of the Quilted

SewCal Gal's 2012 Free Motion Quilting Challenge - February

Image
I have been working on the Sawtooth Star Wall hanging Quilt for past couple of weeks. I want to enter this for the February challenge. I had initially started this quilt for Leah Day's Quilt Along - Week5 . Here I have combined the lessons learned from Leah Day on Stippling and Diane Gaudynski's February tutorial on Echo Feather Plume. This is my first time ever to try the feathers in free motion quilting. If you have been reading my blog you would know that I just started learning free motion quilting this year. So here is how my process started towards the feathers. I doodled on paper quite a few times to get the feathers as seen in Diane Gaudynski's tutorial(link provided above). Then thought about how can I quilt them. I drew the stem of the feather first using a pen(this mark goes away when you iron the fabric). Then started quilting the feathers as per Diane's instructions. After quilting few feathers, I was more confident and quilted the feathers with

Quilt Along with Leah Day - Week 6

Image
Thursday  Feb 9th I was so glad to see Leah blog this week. A big sigh of relief that I won't be getting myself into piecing more quilts. I can just focus all my energy into finishing up the two quilts which I started for Week 4 and Week 5. This is really fun, I wish I had more time to piece more quilts. Sometimes I feel I get hung up on small details and may be trying to be a perfectionist. Which is sometimes hard on my self. Okay, lets talk about more stippling now. I feel I don't have control over my stippling. Actually looks like it always takes a life of its own. So, I would like to go back and practice Week 1's Wiggle Along to get a hold of the basic shapes for stippling. I am using 1/2inch scale, so that I can quilt my butterfly quilt with this. Hoping this practice is going to help with my butterfly quilt. Here is my new changing pad :-): Practicing on 1/2 inch scale stippling Wednesday Feb 15th This was a very challenging and intense week for me tr

Sawtooth Star Table Runner

Image
I made this sawtooth star table runner for Leah Day's Quilt Along - week5 quilting. Here are some of the reference tutorials which I had watched before doing this table runner: For the center block I fussy cut the birds from the fabric, this tutorial was helpful: I used the 3"x6" flying geese ruler from Quilt In a Day to make the flying geese rectangles which really speed up the piecing. Block: The finished block size is: 12.5inches Here is what you need to make each block: 1. Flying geese rectangles - 4 (measures 3.5"x6.5") 2. 3.5" squares - 4 3. 6.5" square - 1 (This is fussycut for the center of each block) Sashing: I used a sashing of 3.5" rectangle by width of the block and then 3.5" by the height of all the blocks pieced together. This is too big. If I have to re-do this all over again, I would rather go with 2.5" sashing. There is too much white space. And then add a dark color outer

Quilt Along with Leah Day - Week 5

Image
It was just so exciting to see comments from Leah, Pat & Anee and all! Leah you are my free motion quilting inspiration. Thanks again for all the tutorials. This week I am taking the things Leah taught and apply that to my butterfly quilt. If I have extra time,then I will try to piece up a table runner with saw-tooth-star. Lets see if its possible. Butterfly Quilt: Here are pictures of the butterflies and lady bugs I tried to stipple into, I would call this micro stippling. The butterflies on my quilt are approximately 4x4inches and looks like my stippling scale is probably 1/8th of inch or less. The lady bugs may be 1/16th inch of stippling. So tiny or dense. Micro-stippling on the lady bug with circle motif Another attempt at micro-stippling So far, this is my best quilted butterfly More stippling I am planning to finish my butterfly quilt with pink thread. Since, this is my try out quilt. I wanted to play with the thread colors. I would like to go and f

Quilt Along with Leah Day - Week 4 - Issues-Resolved

Thread Issue: I was using variegated thread for my butterfly quilt and my top threading was very loopy and I was thinking that my thread was an issue. Then last night I felt like changing my needle from 90/14 quilting needle to 100/16 needle. As soon as I did this, my stitches were pretty again. So, looks like the variegated thread needs a heavier needle like 100/16. This morning I was reading SewCalGal's quilting suggestions: http://sewcalgal.blogspot.com/2011/12/suggested-supplies-for-free-motion.html Guess, what here is the what I found, BINGO! "Sewing machine needles :   Topstitch needles 80/12, 90/14.  100/16 topstitch needles for heavy decorative thread and 70/10 for thinner threads, such as silks." At least one problem solved. I'm just thrilled :-).