This week's task was very interesting. Even though I didn't get into quilting too long ago. I already have many UFO's. To the matter of fact my very first pieced quilt was never finished. I had used a charm pack to piece the quilt with 6 rows and 6 columns. The past weekend I added an additional row and two borders. The first one is 2.5" width and 2nd one is 5.5inch width.
Here is the picture of the quilt top all finished.
Pieced Quilt Top
This is the black fabric I going was originally going to use for my backing. But I didn't have enough fabric to do so. I guess when I bought these fabrics I didn't have any idea about how much fabric would be required for the backing, borders etc. Any way I might plan to make another quilt just like this. Or use this black fabric as the center for a different quilt. I love the flowers and have been tempted to just quilt around them and make them pop on my Quilt top. I will definitely do a post on this if I do another quilt with this. I'm just so in love with this black fabric. It looks like flowers floating in water. The colors are really vibrant.
Black flowers fabric by Kitty Yashodha for Benartex
I got the quilt top all ready by Monday evening and its now Wednesday evening and still haven't got a moment to baste my quilt.
This week I'm struggling to find time to quilt. I can't wait for the baby to get back to his normal schedule of sleeping at night and taking his naps. The basting step seems to be never happening.
Its Thursday morning on March 1st, I finally got time to baste my quilt. Hopefully I should be able to finish quilting it tonight. Lets see...
Its Thursday midnight or Friday early morning ;) and I finally got to finish up my quilt. Binding is yet to be done. But thinking of doing it later and adding the picture.
Quilt Front
Quilt Back
My experience:
I wanted to share my experience with large scale stippling. I would have to say it was kind of tough. I think the last one I did with the Butterfly quilt was about 1/2inch wide. Which seemed to be a perfect size for me. This time I started with 3/4inch wide stippling but at some places you might see that its as wide as 1inch. I did do the quadrant quilting like Leah's mentions in her blogs. I following everything she is saying but I really don't have any control over either on my rows nor the direction it went. But somehow each time I managed to fully quilt one quadrant and then moved to the next adjacent one.
Also the other thing I noticed I was doing is like Leah shows in her Quilt Along - Week 9 above is that I was trying to look at my quilt too to see what I had stitched before. And that position was straining my neck. I didn't have the same problem when I did the 1/2 inch stippling. So, my conclusion is that large scale stippling is really challenging on my domestic sewing machine.
Thank you, Liz! I love that black fabric too. Actually I was first planning to have it for my back of the quilt. But didn't have enough fabric. It could just be the center of the top my itself. Will post some pics of it.
I've just enlarged the photo of the back of your quilt to look at your stippling - it's great! I didn't do large-scale, because I changed my mind about the design I wanted on my quilt, but found it tough working on a bigger quilt - knowing where I was going and just the physical effort of heaving the thing through the machine!
Thank you, Anne! But I like the stippling scale which I did for butterfly quilt(1/2 inch). This one seems to be too large and my stipple are very elongated. Any way was just glad to get it done :-).
P.S: My previous comment had so many errors, I deleted it and recreated this one. I thought it showed that I was sleep deprived ;)..LOL
Welcome to the Day 7 of Wake up to KONA blog hop. First I wanted to thank two amazing people behind this blog hop, Mdm Samm for organizing this blog hop and Carol@Justletmequilt.com for being our cheer leader. I am really excited about this blog hop. I have been collecting different shades of purple, blues/aquas/greens etc for last couple of years. Finally decided to go with the different shades of purples/magenta. Kona Purple 10" Squares I was very ambitious, but only got the wall hanging done. Here is my quilt top: StarBurst Quilt - 32inch square I have used 4 different background colors starting from top: Kona Pepper Kona Charcoal Kona Coal Kona Steel You can't really tell much difference between the Kona Coal and Kona Steel. I did some black/white shots to see the color value and they seemed to be the same. But Steel has a little bit blue tint to it. Kona Coal seem to match the Kona Charcoal for the transition. My original plan was to make a lap q...
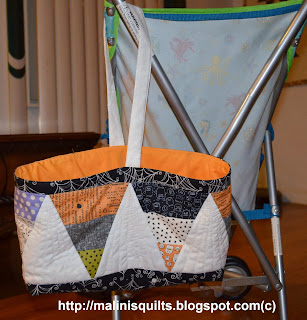
Welcome to the Wicked Blog hop brought to you by Wicked Wendy and Madm Samm . Looks like I am diving from one Halloween project into the other since September. After 2 spider web quilts I wanted to do something different. How about WICKED ONE HANDLE BAG. My inspiration was the one eye monster Mike from the "Monster University" movie. There triangles where left over from the Boo-crew spider web quilt below. I don't like to waste any fabric ;). Quilted the white triangles with radiating rays Wicked Bag with Spider web quilt Here are my 2 "Cute And Spooky Spider web" quilts along with link to the tutorials: The first one is my most recent Spider web quilt just finished last week using Moda's Boo crew fabric line. Click here for the tutorial using Spider Web ruler Cute and Spooky Spider web quilt - tutorial here This one I made it for Riley Blake Design's Cutting Corners College. It doesn't require any special ruler for...
I welcome you all to Day1 of Think Ruffles blog hop organized by amazing Mdm Sam @ SewWeQuilt and our amazing cheer leader Amy @ SewIncrediblyCrazy blog. I wanted to thank both Mdm Sam and Amy for this wonderful blog hop. Now peak at my project, a ruffled pillow with zipper. I have been wanting to make ruffles for a while and had one particular pillow in mind, V & Co's white ruffle pillow . I made mine with white Kona Cotton. The strips for the ruffles are 1.5inches. The finished pillow cover is 12"x18". Kona Honey Buns - 1.5inch strips My Little Quilty Model Oh..Ruffles...Ruffles... This time around I even got to add a zipper. Yay for me! I saw this video on zipper and it just made it so much more simpler to add a zipper to any project. Invisible Zipper Ruffles posing for camera Oh My, these ruffles are addictive Do you see the snow outside the window? Ruffles smiling for the camera - isn't that too bright ;) ? Th...


Lovely how the black border fabric pulls it altogether and your meander quilting looks great.
ReplyDeleteThank you, Liz! I love that black fabric too. Actually I was first planning to have it for my back of the quilt. But didn't have enough fabric. It could just be the center of the top my itself. Will post some pics of it.
DeleteI've just enlarged the photo of the back of your quilt to look at your stippling - it's great! I didn't do large-scale, because I changed my mind about the design I wanted on my quilt, but found it tough working on a bigger quilt - knowing where I was going and just the physical effort of heaving the thing through the machine!
ReplyDeleteThank you, Anne! But I like the stippling scale which I did for butterfly quilt(1/2 inch). This one seems to be too large and my stipple are very elongated. Any way was just glad to get it done :-).
DeleteP.S: My previous comment had so many errors, I deleted it and recreated this one. I thought it showed that I was sleep deprived ;)..LOL